I have gotten rave reviews from family, friends, and even strangers with this cake. It actually got bumped to the top of my “I really need to type this recipe up into a blog post soon” list due to so many requests for the recipe!
Make it for your next get-together and you won’t be disappointed! You’ll also be everyone’s favorite person!
This cake came together on a whim of me wanting to make something I couldn’t find a recipe for. It is a combination of a few different weight watcher’s recipes that I have seen. Since I couldn’t find what I was looking for, I combined a few ideas and tweaked them in order to make what I had in mind. What was that you ask?
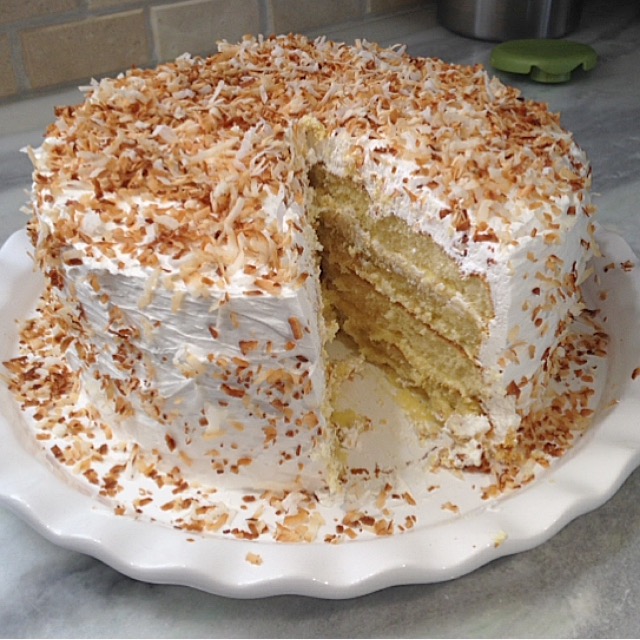
Well, I wanted something healthier than the usual coconut cake—some are over 600 calories a slice! I also wanted it to turn out super decadent and moist, despite being “healthier.” I knew using the pineapple puree would accomplish that, but was worried that making the entire cake out of those layers may cause it to end up too mushy, so I decided to alternate them with a version of the diet soda weight watcher’s recipe that there are so many versions of. I swapped out the diet soda for La Croix coconut sparkling water. Alternating the layers this way worked out beautifully. The pineapple layers were so rich, and the diet soda layers kept the integrity of the multi-layer cake!
For the filling between the layers, I wanted to recreate a vanilla cream, but without so much fat. I used vanilla Greek yogurt as the base, which adds the added benefit of protein!
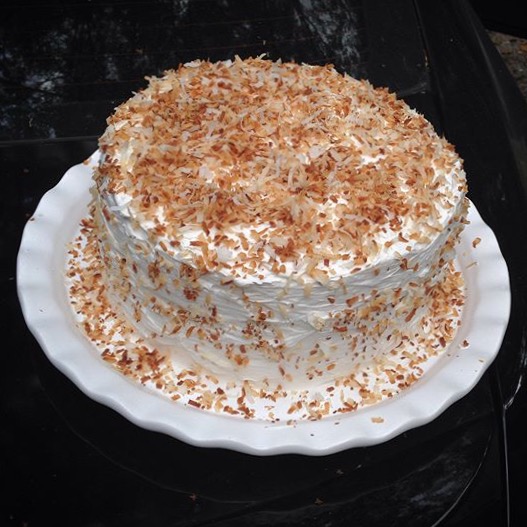
Finally, for the “icing,” I wanted something more light and fluffy than the cream on the inner layers. I went to look at my options in the whipped topping section of the freezer. I wasn’t sure what I was going to use… Cool Whip, Tru Whip, sugar free, or regular… Then I saw So Delicious had a coconut based version!! Until then I never even thought about it. I knew right away that I had to use the Coconut Whip for this cake! It was a bit higher in calories and sugar than what I had hoped, but it was coconut flavored, so I was sold! I’m so glad I got it…it was perfection!
The other thing I like about this cake is that, while it may not be home made, using the box mixes means that it really is not a lot of ingredients. You could probably even use gluten free cake mixes if you needed to!
A few notes to consider before you start making this cake:
1/ It is best to prepare the cake layers in advance so that they have time to cool on the counter, then chill completely in the refrigerator. I have made them the night before as well as the day of serving. When I made them the day of, I allowed a few hours to cool. Both the night before and the day of turned out well. Regardless of when you make them, you don’t need to make the cream or the frosting until you are ready to assemble the cake. Just make sure you allow time for the whip topping to thaw before you try to mix in the pudding!
2/ The pineapple layers are a bit tricky for a couple of reasons. First, because they are so moist, it is difficult to determine when they are done baking, even using the toothpick method. I baked them for the time duration according the box directions for 2 round pans plus an additional 1-2 minutes. I would recommend you just start checking often when close to that time. My toothpick mostly came out clean and the edges were starting to brown. I’ll take pictures and update the next time I make it. Also, even once chilled, they tend to want to stick to the pan. The first time I made the cake I used regular cake pans, and I was worried it would break when I inverted it to remove, but I managed to go very slow, working from the edges in, and it didn’t break. If it does, you could still put the pieces together and I don’t think you’d be able to tell once all the layers were assembled. The second time I made the cake, I bought disposable aluminum pans from the Dollar Store. Once cooled, I cut the sides off and this made it easier to transfer to the platter, because all I had to do was flip the cake over onto it and peel the pan bottom off… Again, I’ll take photos and update the next time I make it so this makes more sense. Or I may just give these a try next time!
3/ The first time I made the cake, my soda layers had a mound on top that didn’t settle to create an even cake layer the way that the pineapple layers did. I simply used a knife to carefully cut that part off and make the surface flat. The second time I made it, they ended up even and I didn’t have to worry about it. I really have no idea why. Maybe it had something to do with using a sugar free cake mix the second time? Maybe a difference in humidity between the two days that I baked them on? Who knows… Just figured I’d share in case you end up with the “bump” on the top of those layers and need to know how to manage it. Photos will be added for this too if needed. I imagine you can google how to do this since I’m sure professional cake makers use this trick often. Maybe they even have a more efficient method than what I used!
4/ I use a digital kitchen scale whenever I bake to make sure I have precise measurement in grams and/or ounces. I highly recommend using one in order to get predictable results. It won’t likely be as crucial to this recipe as it is to some of my others, but it is still a good tool to have for any recipe in my opinion.
Piña Colada Cake:
Ingredients:
Pineapple Cake Layer (bottom and 3rd layer):
- 1 box of vanilla cake mix (can use regular or sugar free)
- 20oz of fresh pineapple, processed in the blender until there are no big chunks (I bought pre chopped to save time slicing one myself)
- 1 TBSP coconut extract (I like Lorann Oils super strength flavor. Note: it is the one that says hard candy flavoring oil, not the emulsion)
- Optional: rum extract (I haven’t added this in before, but imagine it would be good for those who like traditional Piña Coladas!)
La Croix Cake Layer (2nd and top layer):
- 1 box vanilla cake mix (can use regular or sugar free)
- 1 TBSP coconut extract (I like Lorann Oils super strength flavor. Note: it is the one that says hard candy flavoring oil, not the emulsion)
- 1 can of Coconut La Croix
Vanilla Cream Layer (goes in between the layers):
- 12oz Vanilla Light and fit Greek yogurt (I buy the big tub and just use part of it. You could also use the toasted coconut flavor that comes in the individual size containers)
- 1/4 package Jell-O Simply Good Vanilla Bean Instant Pudding Mix (dry pudding only)*
Vanilla Coconut Whipped Frosting (to frost the outside):
- 9oz container So Delicious Coconut Whipped Topping (You could use sugar free Wool Whip or Tru Whip to reduce calories some, but in my opinion, the coconut flavor in the So Delicious topping absolutely makes the cake)
- 1/4 package Jell-O Simply Good Vanilla Bean Instant Pudding Mix (dry pudding only)*
To Decorate:
- 1oz shredded coconut flakes, toasted in a pan on the stove (I used the sweetened coconut)
*Note: You will have half a package left over.
Instructions:
- Preheat oven as directed on the cake mix package. My mix was 350º F. Spray two cake pans with cooking spray.
- Mix all of the pineapple layer ingredients together using a hand mixer or countertop mixer. Divide evenly among 2 pans.
- Bake until toothpick comes out clean. As I noted above, it may never come out all the way clean because of the fruit puree. If the edges start getting brown and the toothpick is mostly clean, I’d say take it out.
- Cool on wire rack on the counter, then transfer to the fridge to chill.
- When the pineapple layers are done baking, mix the La Croix layer ingredients together with the mixer and divide evenly between two cake pans sprayed with cooking spray. Again, bake according to the package, but keep in mind they will take a few less minutes than the pineapple layers did.
- Cool on wire rack on the counter, then transfer to the fridge to chill.
- When ready to assemble, use hand mixer to mix the cream layer ingredients. It will be thick.
- Start with a pineapple layer on the serving platter or the tray of a cake carrier (make sure your lid for whatever dish you are using is tall!) and use the method I outlined in the notes above to navigate the flipping it out.
- Spread 1/3 of the cream layer on top using care not to crumble the cake. I have found it works best to place the cream in the center and spread it outward toward the edges.
- Add a La Croix layer and repeat step 9.
- Add the second pineapple layer and repeat step 9.
- Add the second La Croix layer.
- The La Croix layers may be slightly larger in diameter than the pineapple layers, but this is ok. Line them up evenly as you can and you can just make up the difference in the pineapple layers with the frosting, if needed. It is maybe 1/8-1/4 inch at most, and once frosted, nobody will notice, even once the cake is cut.
- Mix the frosting ingredients with the mixer until smooth. It will be light and fluffy. Frost the top and sides, filling in where needed to make the sides even. Smooth it some, but keep in mind you don’t need to get the frosting perfectly smooth on the surface because the coconut will cover it some.
- Sprinkle the top with coconut. It is easiest to cover the sides by taking small pinches of coconut and “flicking” it at the sides so that it sticks. Some will fall onto the platter. Just slide it off and reuse until it is all stuck to the surface evenly 🙂
- Cover and chill in the fridge until ready to cut!
Nutrition (per serving if divided into 16 servings and using sugar free cake mix):
250 kcal / 6g fat / 4.5g protein / 60g carbs (9.3g net sugar)
Compare that to a standard recipe from All Recipes:
606 kcal / 28.2g fat / 5.8g protein / 85g carbs (sugar was not listed on the nutritionals).
Let me know if you try it! I’d love to see photos of your recreations if you make them! You can tag me @CheeseGirlPA on Instagram, or Kaci Cheeseman on Facebook page.
| Kaci
